
What Causes an Electric Shower Leaking from the Base?
To fix an electric shower leaking from the base, first isolate both the electrical power supply and the cold water feed. Next, eliminate downstream back-pressure by descaling the showerhead nozzles and replacing any kinked or collapsed hoses. Finally, remove the front cover to replace the blown Pressure Relief Device (PRD) assembly with a genuine OEM part or reseal compromised internal plumbing joints.
When an electric shower leaks from the bottom, the cause usually falls into one of three distinct categories: an intentional safety discharge, a compromised internal plumbing seal, or a failing mechanical valve. Because electric showers heat cold mains water instantly inside a compact, pressurized heater tank, they operate under tight mechanical and hydraulic tolerances. Any restriction to the water leaving the unit forces back-pressure into the internal heating canister.
Pressure Relief Device (PRD) Activation
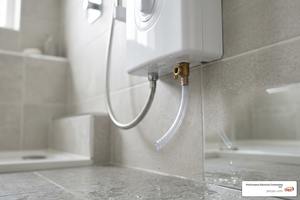
The most frequent reason an electric shower discharges water from the base is the activation of the Pressure Relief Device (PRD). The PRD acts as a vital fail-safe mechanism. Under normal operation, water flows freely past the internal electric heating elements and out through the handset nozzles.
However, when limescale accumulation chokes the showerhead spray plates, or if an internal hose liner collapses, pressure rapidly accumulates within the heater tank. Without a pressure release mechanism, this dynamic pressure could rupture the heating canister. To prevent a catastrophic failure, the PRD features a calibrated rubber ball or rupture disc designed to blow out at a specific pressure threshold.
According to authoritative manufacturer guidance on bottom leaks and PRD activation, once the PRD activates, it releases water downward through a dedicated discharge pipe. Crucially, the PRD is a one-time safety device; once it blows, its internal seal is permanently broken and the component must be physically replaced before the shower can safely operate again.
PRD Overflow Tube vs. Casing Seam Leaks
Differentiating between a deliberate PRD activation and a hazardous internal casing leak is critical for determining how to proceed safely:
- PRD Overflow Tube Discharge: Water exits strictly through a clear plastic tube or molded outlet elbow located at the bottom-right or bottom-center of the casing. The leak usually occurs immediately when you push the start button or turn the flow dial on.
- Casing Seam or Backplate Leaks: Water seeps out from the perimeter seams of the plastic cover, dribbles down the wall behind the backplate, or drips from internal screw mounting points. This indicates an internal plumbing failure, such as a cracked push-fit inlet elbow, a deteriorated O-ring on the heater tank inlet, or a hairline fracture in the canister itself.
| Leak Characteristic | PRD Safety Activation | Internal Casing / Seam Leak |
|---|---|---|
| Discharge Point | Dedicated clear tube / bottom vent | Plastic cover seams, backplate, screw holes |
| Primary Root Cause | Downstream blockage (limescale, kinked hose) | Degraded O-rings, loose push-fit joints, cracked tank |
| Timing | Primarily while the shower is actively running | Can occur when running or continuously under mains pressure |
| Safety Risk Level | Controlled hydraulic discharge; unit unusable until fixed | High electrical hazard; water near live internal terminals |
| Required Action | Descale handset, replace PRD assembly | Immediately isolate power and water; repair internal seals |

Solenoid Valve and Continuous Dripping
If your shower drips steadily from the handset even after turning the shower off, the culprit is typically the solenoid valve rather than the PRD. The solenoid valve uses an electromagnetic coil (typically measuring between 1kΩ and 4kΩ of resistance across its terminals) to lift a rubber diaphragm off a machined valve seat when power is applied, allowing mains water to enter the heating canister.
Over time, mineral deposits and limescale can accumulate directly on the rubber seal or mechanical valve seat. This debris prevents the plunger from seating flush when the shower is turned off, allowing incoming mains water to slowly weep past the valve, fill the heater canister, and drip continuously out of the showerhead.
Critical Safety Hazards and Isolation Protocols
Electric showers represent one of the highest electrical load demands in any modern building. A typical 10.5kW electric shower draws approximately 46A of current at 230V, requiring a dedicated 50A Type B circuit breaker and heavy-gauge cabling. Because water and high-amperage electricity share an enclosed space inside the shower unit, any water leaking outside its intended plumbing path requires caution.
Is an Electric Shower Leaking Safe to Use?
No, you should never use an electric shower while it is leaking. As detailed in dedicated safety guidance on using a leaking electric shower, pooling water inside the unit housing compromises the electrical insulation integrity of internal components.
Electricity can be lethal in less than a second if protective safety systems fail. When water escapes internal pipework, it can bridge the gap between live 230V terminals and the shower’s grounded casing or metal components. While standard building codes require bathroom circuits to be protected by a sensitive 30mA Residual Current Device (RCD), you should never rely solely on a safety breaker as a substitute for fixing a physical leak.
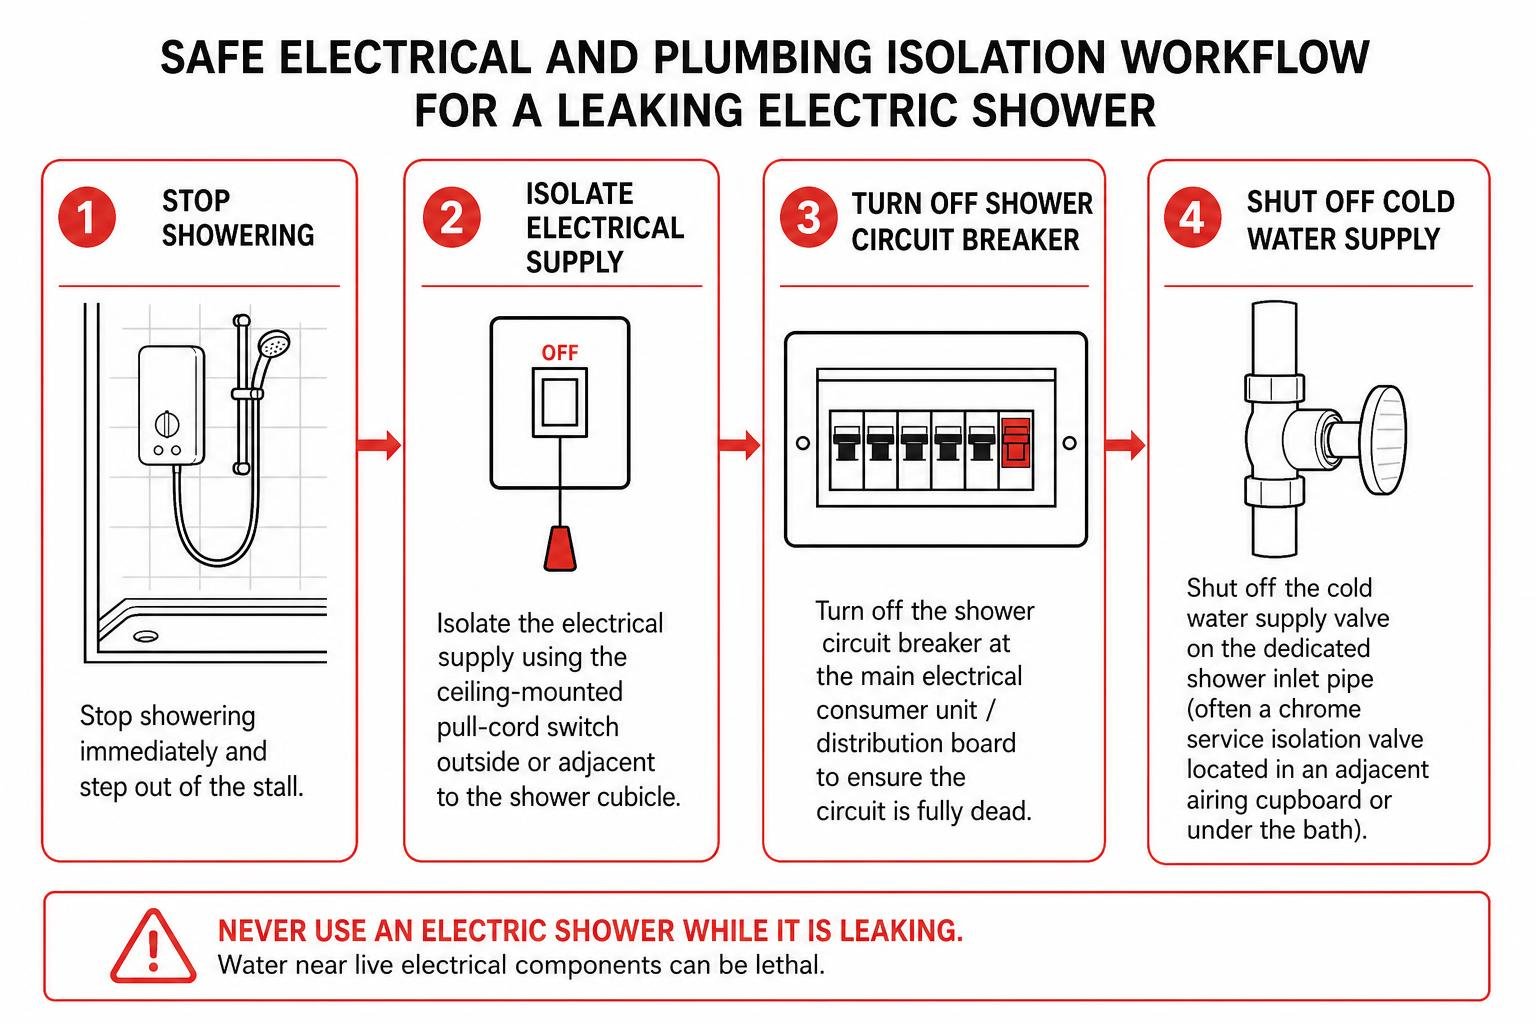
If you spot a leak from the unit casing or base, follow this immediate isolation protocol:
- Stop showering immediately and step out of the stall.
- Isolate the electrical supply using the ceiling-mounted pull-cord switch outside or adjacent to the shower cubicle.
- Turn off the shower circuit breaker at the main electrical consumer unit / distribution board to ensure the circuit is fully dead.
- Shut off the cold water supply valve on the dedicated shower inlet pipe (often a chrome service isolation valve located in an adjacent airing cupboard or under the bath).
Electrical Shocks and Static Tingles
Under no circumstances should you ever experience a tingling sensation or mild electric shock when touching a metallic shower hose, handset, or control dial. A “static tingle” from a shower is not static electricity; it is a clear sign that electrical current is actively tracking through the water stream or metal fixtures due to:
- A ruptured heating element casing exposing live resistance wire to the water path.
- Inadequate or loose protective earth bonding.
- A malfunctioning RCD that has failed to trip within its mandatory 16mA to 30mA fault current window.
If anyone reports a tingling sensation, immediately isolate the shower at the main consumer unit breaker and keep it out of service until a qualified professional inspects the grounding integrity and performs an insulation resistance test.
Step-by-Step Guide to Fixing Base Leaks and Replacing a PRD
Fixing a blown pressure relief device is a manageable task, provided the electrical circuit and water supplies are fully isolated beforehand.
Required Tools and Materials
- Safety Equipment: Non-contact voltage tester or multimeter, protective gloves.
- Hand Tools: Pozi-drive and flat-head screwdrivers, adjustable spanner/wrench.
- Consumables: Genuine OEM replacement PRD assembly (specific to your shower model), PTFE plumber’s tape, white vinegar or proprietary descaling solution.
- Cleaning Supplies: Old toothbrush, small container or bucket.
1. Clearing Downstream Obstructions
Before installing a new PRD, you must remove the blockage that caused the excessive back-pressure in the first place. If you skip this step, your brand-new PRD will blow the moment you turn the shower back on.
- Unscrew the shower handset from the flexible metal hose.
- Inspect the rubber sealing washer inside the hose nut for deterioration or dislodgement.
- Submerge the showerhead in a bucket containing equal parts warm water and white vinegar (or a specialized descaling agent) for at least 30 to 60 minutes.
- Use an old toothbrush to scrub away dissolved limescale crust from every individual rubber nozzle.
- Inspect the flexible hose: stretch it out and look through the core. If the internal rubber liner has twisted, kinked, or collapsed internally, discard and replace the hose.
2. Replacing the Blown Pressure Relief Device
With the water and electrical power confirmed dead:
- Remove the retaining screws securing the front plastic cover of the electric shower unit and carefully lift off the casing. Pay close attention to any ribbon cables connecting the front control dials to the internal Printed Circuit Board (PCB).
- Locate the PRD assembly, typically situated at the bottom outlet of the copper or plastic heating canister, adjacent to the hose connection point.
- Remove the retaining screws or metal retaining clip holding the ruptured PRD housing to the heater tank outlet.
- Pull away the old PRD assembly, ensuring the ruptured rubber ball, split diaphragm, and old O-ring are completely removed from the outlet tube socket.
- Apply a light smear of silicone grease (plumber’s grease) to the new O-ring on your genuine OEM replacement PRD.
- Seat the new PRD firmly into the outlet elbow and secure the retaining screws evenly. Always use genuine parts manufactured to compliant standards (such as BEAB approval and EN 60335 compliance). Using generic or modified parts can cause the device to fail to rupture under pressure, risking tank failure.
3. Inspecting and Tightening Internal Plumbing Connections
While the unit casing is removed, inspect all other water joints for signs of weeping:
- Inlet Push-Fit Joints: Ensure copper inlet pipes are fully deburred and inserted past the internal O-ring stops.
- Inlet Filter Screen: Unscrew the cold water inlet filter housing, remove the mesh screen, and rinse away any trapped pipe scale or grit before reassembly.
- Casing Replacement: Reattach the front casing securely, ensuring internal wiring harnesses are neatly routed away from water pathways and moving control spindles.
Long-Term Maintenance and Repair vs. Replacement
Electric shower longevity depends heavily on local water hardness. In areas with soft water, a quality electric shower routinely operates for 7 to 10 years without significant maintenance. However, in hard water regions with elevated calcium and magnesium levels, mineral scale accumulates rapidly on the heating elements and solenoid seats, reducing the unit’s practical lifespan to 5 to 7 years.
To extend the service life of your shower:
- Install an Inline Scale Inhibitor: Fitting a magnetic or polyphosphate dosing scale inhibitor on the cold-water feed upstream of the shower prevents calcium carbonate from adhering to internal elements.
- Establish a Monthly Descaling Routine: Soak the handset nozzles in white vinegar monthly to keep back-pressure to an absolute minimum.
- Run Cold Water After Use: If your shower features a “phased shutdown” feature, let it run so it can flush residual hot water out of the canister, preventing scale bake-on.
When to Replace an Electric Shower Leaking Constantly
A standard domestic electric shower unit typically costs between £150 and £400 (or $200 to $500 depending on region), with professional installation adding £150 to £300.
When evaluating persistent leaks, refer to detailed electric shower fault diagnosis and repair costs. As a general rule of thumb, repair is economical for units under 5 years old where the fault is limited to an inexpensive mechanical component like a £15 PRD or an £80 solenoid valve.
However, if an older unit requires a new heating canister, has a burned-out PCB, or exhibits structural casing cracks, full unit replacement is almost always safer and more cost-effective.
Electrician vs. Plumber: Knowing Who to Call
When troubleshooting a persistent leak or electrical fault inside a shower unit, hiring the right trade professional ensures compliance with safety regulations and building codes (such as BS 7671 standards in the UK or NEC wet-location codes in North America).
- Call a Plumber When: The leak originates outside the unit (such as in-wall supply pipework), household mains water pressure is fluctuating below dynamic operating limits (under 0.7 to 1.0 bar), or isolation valves need physical re-plumbing.
- Call a Qualified Electrician When: The shower trips the consumer unit breaker or RCD, you experience any static tingling sensation, you need internal electrical component testing (insulation resistance, continuity), or you are installing a replacement unit that alters the electrical circuit load.
Frequently Asked Questions About Electric Shower Leaks
Why does my electric shower continue to drip after being switched off?
A shower that drips constantly from the handset nozzles after you switch it off is almost always suffering from a worn or limescale-fouled solenoid valve. When mineral scale builds up on the rubber valve seat, the spring-loaded plunger cannot create a watertight seal, allowing mains water to continuously weep through into the heater tank and out through the head.
Can I repair a blown PRD without replacing the part?
No. A Pressure Relief Device utilizes a calibrated rupture disc or molded rubber ball that breaks or deforms permanently when dynamic pressure spikes. It cannot be glued, reset, or modified. Attempting to seal or alter a blown PRD eliminates the shower’s emergency pressure release, which can lead to a dangerous heater tank rupture. Always install an authentic, model-specific OEM replacement part.
Why did my new PRD blow immediately after installation?
If a replacement PRD blows immediately upon turning the shower back on, the root downstream obstruction was not resolved prior to testing. The showerhead nozzles remain clogged with limescale, the shower hose has an internal collapse, or an incompatible, highly restrictive “water-saving” handset was fitted to the unit, instantly rebuilding excessive back-pressure.
Conclusion
An electric shower leaking from the bottom should never be ignored. Whether the leak is a controlled discharge from an activated pressure relief device or a hazardous internal seal failure pooling near high-voltage wiring, swift isolation of both electrical and plumbing feeds is essential to protect your property and personal safety. By systematically descaling downstream components, replacing ruptured PRD assemblies with genuine OEM parts, and maintaining your cold-water inlet filters, you can ensure dependable performance for years to come.
For complex electrical troubleshooting, circuit breaker upgrades, or professional fixture installations, our team at Performance Electrical Contracting Inc. delivers safe, code-compliant, and value-driven results. Explore our complete range of professional electrical services to keep your residential, multifamily, or commercial electrical systems running safely and efficiently.